Home » diy

Tag: diy

DIY Sensory Board

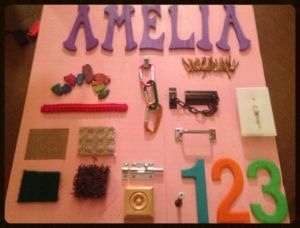
This Christmas we struggled with ideas on what to get Amelia as a gift. She was only 4 1/2 months old, so there wasn’t anything she needed or wanted. I came across this idea for a Sensory Board from someone else and searched them on Pinterest. I had no idea how popular they were! When you search for them, so many different types popped up! I was so excited to do this for Amelia. It was inexpensive and creative.

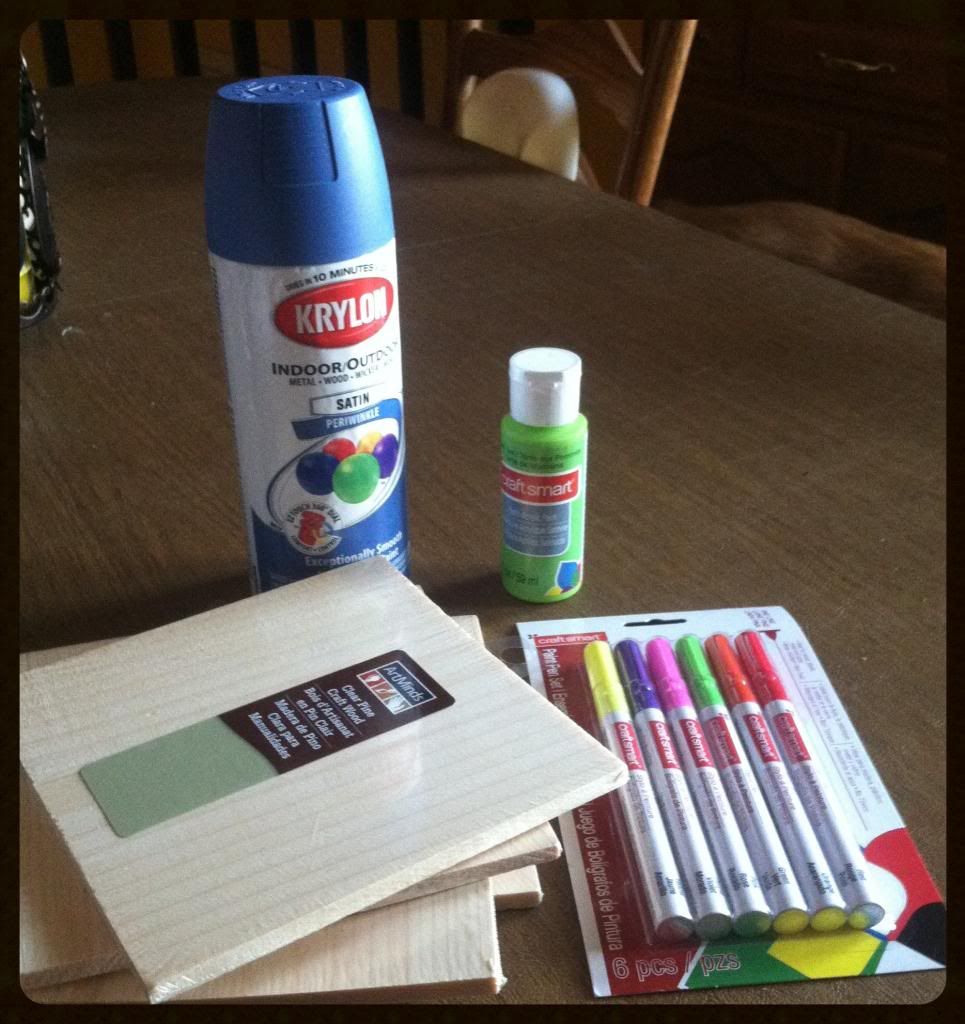
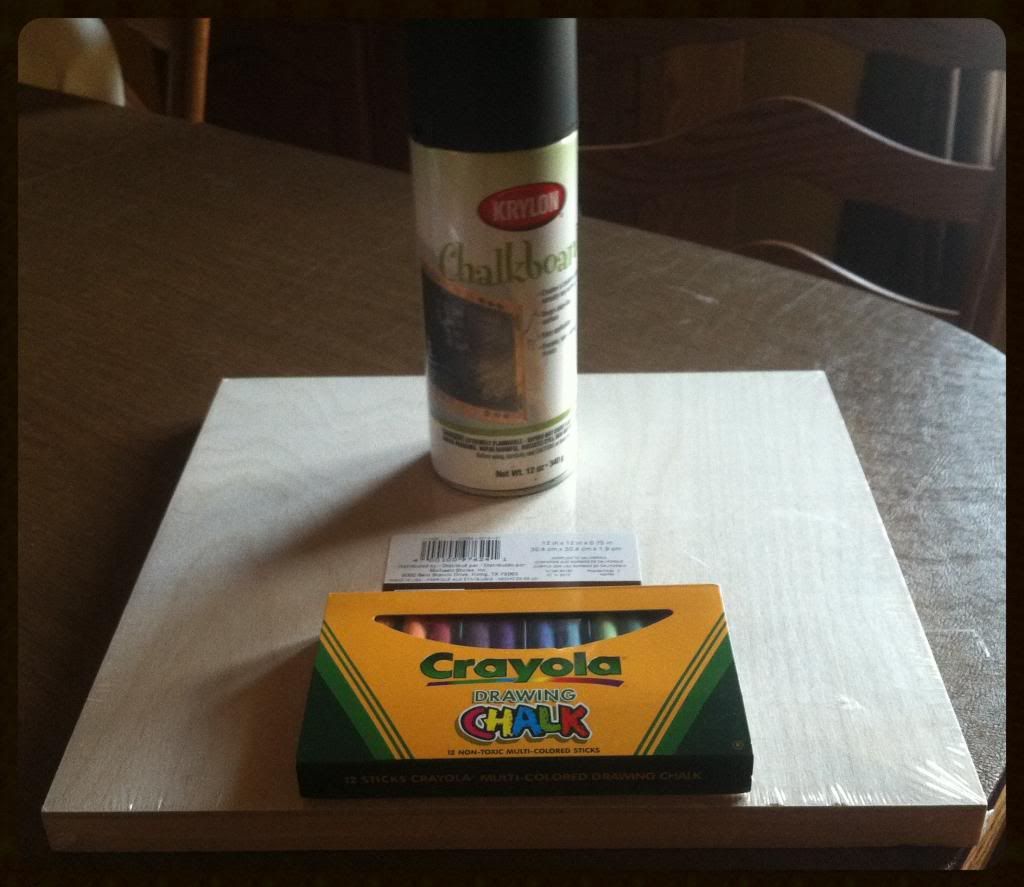
We purchased everything from Menards, besides a few items we purchased at Michaels. Here is what we used for our sensory board:

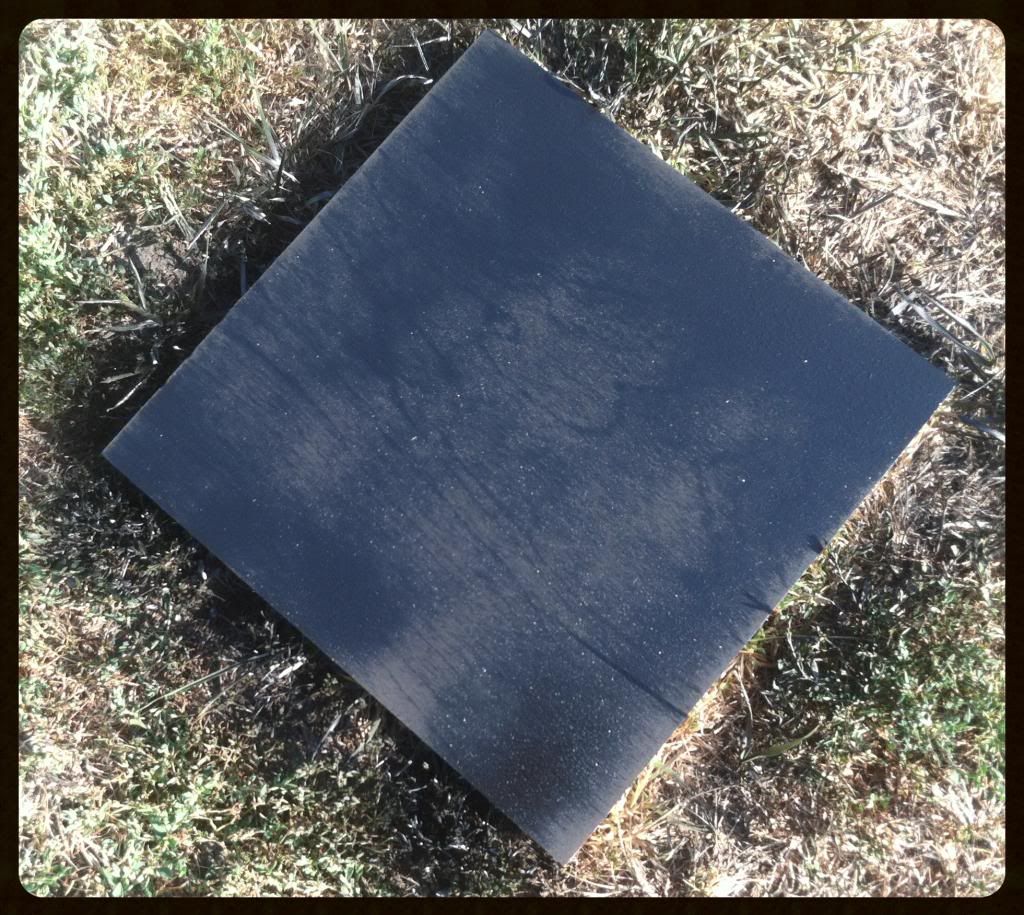
  1. You need a board – Ours is 2 feet by 2 feet. You can get much larger or smaller. We thought this would be the perfect size to pull out and store away when it is not being used.
  2. Spray paint – I decided to spray paint ours pink. There are a lot of people who just leave it the natural wood color also. It’s whatever YOU want to do!
  3. Chain door guard
  4. 3 inch spring door stop
  5. Switch & plate
  6. Red paracord bracelet
  7. 3 carabeeners, different colors
  8. 3 carpet samples
  9. Sandpaper
  10. Door chain
  11. Sash lift
  12. Spiky wood chain – Michaels
  13. Colored glass rocks – Michaels
  14. Super Glue
  15. Wood Glue
  16. Screws & Drill
  17. Wooden letters & numbers – Michaels
  18. Various paints for letters & numbers – Michaels
  19. Wooden square sample

Total at Michaels – $25.86

Total at Menards – $38.50

Total = $64.36

I love how this turned out. I also love that you can do anything to create it your own. Travis and I enjoyed creating this together too!

Easy Peasy Playdough Recipe

I LOVE playdough and so does Monte. Playdough is such a great activity to keep little ones busy for hours. It is the perfect activity station to have available during the day, to play with. I always put out cookie cutters, rolling pins, cups, and any other fun factory toys we may have on hand.

You can either go out and purchase playdough at the store and probably end up paying more then you want OR you can use some baking items you have at home and make your own!

Ingredients & Directions

1 cup flour

1/2 cup salt

1 cup water

1 Tablespoon vegetable oil

2 teaspoons cream of tarter

Add food coloring, scents, glitter, etc.

Heat on medium heat to form ball

The other great thing about playdough is you can spice or sparkle it up 🙂 Last year we made Fall Scented Playdough and had so much fun with all the scents and making turkeys!


There are a lot of different playdough recipes floating around online and on Pinterest, but this was in bullet proof and easy. I made the green, yellow and blue playdoughs in 25 minutes including clean up. You cannot beat that!

What fun things do you and your kiddos do with playdough?


Advent Wreath

When I was little, I remember creating an Advent Wreath in my religious education classes. This is Monte’s second Christmas and it’s important that we celebrate the meaning of Christmas. We all (and I will admit I fall into this EVERY year) get caught up in the buying gifts, decorating, parties, etc.

I created an Advent Wreath from some supplies I gathered at the local Michael’s store.

This year, we will begin an evening tradition of lighting the candles around our Advent Wreath and saying a prayer. I know Monte will not understand what’s going on, but starting this tradition now, will hopefully instill the meaning of Christmas for many Christmas’s to come!

I also purchased this FANTASTIC book!

It’s called the Advent Book by Jack and Kathy Stockman.

I am so excited for this book, because the pages are board pages and have little doors that open up! I am hoping this will grab Monte’s attention while we are reading and praying around our Advent Wreath.

After I created our Advent Wreath I went to our local Catholic store, Divine Treasures to purchase our three purple candles and one pink candle. They also had a free brochure that had samples of reading and prayers to say each Sunday when we light the Advent Wreath. The nice thing with this tradition, is you can do it every night of Advent or every Sunday. You can create it however you like and works best for your family.

What traditions do you do with your little ones to remind them the meaning of Christmas?

Red Activity Box

I created a new, fun activity for Monte to do at my moms house! I got the idea off of Pinterest (where else?!?) and the inspiration actually came from here. I wanted to do a box full of everything that started with the letter “A”, but as I was going through the playroom, it began to be easier for me to collect items that were red. So, there is a mix of both in the box!

I had a random picture box, that I had not used yet. I used this to collect and store my items.

I started with these three books I found! My Little Red Book, Clifford’s Bedtime, and A. They work perfect for this activity!

I then cut out a HUGE letter “A” in red foam, I had leftover from the Foam Shape Activity.

(Excuse the odd shaped “A”)

I then found a bunch of large RED legos and cars!

I also cut out a large heart and placed a sticky note on it reading “color the heart RED!”

We need some RED snacks so I added red strawberries AND applesauce (I added red dye to it)

This is a great and inexpensive activity. You can use items you already have at home! It’s a great way for your kiddos to learn their colors using items they already see and play with everyday!

What fun activity do you do with your kiddo to learn colors?

Grandparents Day 2013

Today is Grandparents Day! Happy Grandparents Day to all of you Grandmothers, Grandfathers, Great Grandmothers, and Great Grandfathers!

Not many are aware that there is a national holiday to celebrate grandparents. When I told my husband the other day that we were working on a project for grandparents day he was like “huh?”

It was in 1978 when Grandparents Day was officially recognized as a national holiday. It was the goal of Marian McQuade to make the youth aware and educate them the importance of seniors in our community. McQade wanted to make them aware of how much seniors have contributed to our history and also encouraged the youth to “adopt” a grandparent.

At first, Grandparents Day was only recognized by the state of West Virginia. When the idea of it being proclaimed as a national holiday was proposed and brought to the U.S. Senate, it died. McQade organized supporters, congressman, etc. in all fifty states for it to become a state holiday. Once she had proclamations of 43 states, she sent copies of the proclamations to Senator Randolph. At that time the U.S. Congress met again and requested that President Jimmy Carter sign a proclamation that proclaimed that the first Sunday after Labor Day, every year, be National Grandparents Day.

The statute cites the day’s purpose: “…to honor grandparents, to give grandparents an opportunity to show love for their children’s children, and to help children become aware of strength, information, and guidance older people can offer”.

All of this information was taken from Wikipedia and can be found here.


Grandparents Day Tiles

I have several ideas posted on my Pinterest page of ideas for gifts to give for Grandparents Day.

Monte and I found this idea here, but I changed it up a bit.

While I was at Michaels purchasing stuff for my DIY chalkboard, I picked up the supplies needed to do this project. Instead of tiles, I purchased wood squares, a can of colored spray paint, acrylic paint for Monte’s hand, and paint pens. All of this cost me about $25.00.

I then took the four boards outside and spray painted them. The spray painted I used was for indoor/outdoor use and left a glossy finish. On the can it said it dried in about 10 minutes. It DID dry quickly! I was able to get a couple coats sprayed, on both sides, in about an hour.

The next day, was the fun part! I had Travis help me with brushing paint onto Monte’s hand and placing it on the tiles. Monte did not really understand what was going on and was more interested in what the gooey stuff was on his hand.

MonteHandprint

Afterwards, I let the hand print dry then took the paint pens which are AWESOME and wrote in Grandparents Day 2013 and Love, Monte.


Monte’s First Day & DIY Chalkboard

Today was Monte’s first day of “preschool”!


Yeah, it’s not really preschool, but he is attending the Parent’s Morning Out Program through West Des Moines Methodist Church. I have been VERY excited about this since I signed him up! He will be going every Friday for a 2 1/2 hours in the morning. It will be a fantastic opportunity for him to meet others his own age, make friends, and do some learning!

West Des Moines Methodist Church offers different schedules and classes you can sign up for. The program Monte is in, is specifically for 18 month to young 2’s. They also have a 2-year old program and 3-old program. For the younger ones you can choose once, twice, or three days a week. For the older children you can choose two, three or four days a week.

Today was the first day, but everything has been so organized thus far. They provided an orientation, schedules of parties and certain activities, schedules of “spirit days” (they are the Preschool Pandas!), and the staff has been so helpful and friendly! I definitely recommend!

Click here for more information and costs!

DIY Chalkboard

To prepare for the first day of school, I have been in search of a chalkboard! I am sure you have all seen on Etsy and Pinterest the new “thing” to do is have your child next to a chalkboard labeled with the event that is going on. I think it’s adorable, so I jumped on the bandwagon! Except, even though this is so popular, I could NOT find a small, individual chalkboard anywhere! So, I made my own 🙂

I got the idea from friend on Facebook! Her idea was to actually spray a white canvas with chalkboard paint. I did a little variation of her idea.

I went to Michaels (my second time there this week!). I purchased a 12×12 wood board, chalkboard spray paint, and Crayola chalk (bright, fun colors). I had a 40% off one item coupon, so my total was about $20.00 for everything.

I went home and took the board outside and spray painted it. I let it dry for about 30 minutes and sprayed it again. I let it dry for another 30 minutes, flipped it over, and sprayed the other side!

The instructions on the spray paint can, instruct you to take a piece of chalk and rub across the whole board, then wipe off before using. After doing this, it wasn’t so black it had that chalkboard effect on it.

Its pretty cool how well this turned out! I love it! The only difference, you cannot use a classic chalk eraser to erase the chalk. I used a damp towel to wipe it after I used it and i came off great!

Do you do anything special for your kiddos first day of school?